How to Use Attach in Cricut Design Space
Stumped by Cricut scoring tools? Not sure how to change cut lines to score lines? Here's how to score using Cricut Design Space and your Cricut cutting machine!
Many SVG cut files use the handy score feature available with Cricut. Scoring makes it SO much easier to fold your paper and cardstock. Alas, Cricut Design Space has no way of knowing if an uploaded SVG cut file's lines are actually score lines. That means you have to manually change certain lines from cut to score after you upload a design. And if you're new to Cricut and scoring, it's not always so obvious how to do this. But I can show you how to use your Cricut scoring tools, set your score lines in Cricut Design Space, and make sure the scores stay with the right layer.
NOTE: I updated the photo tutorial below in summer 2021 to reflect the updated version of Cricut Design Space.
This post contains some affiliate links for your convenience (which means if you make a purchase after clicking a link I will earn a small commission but it won't cost you a penny more)! Read myfull disclosure policy.
About the Cricut Scoring Tools
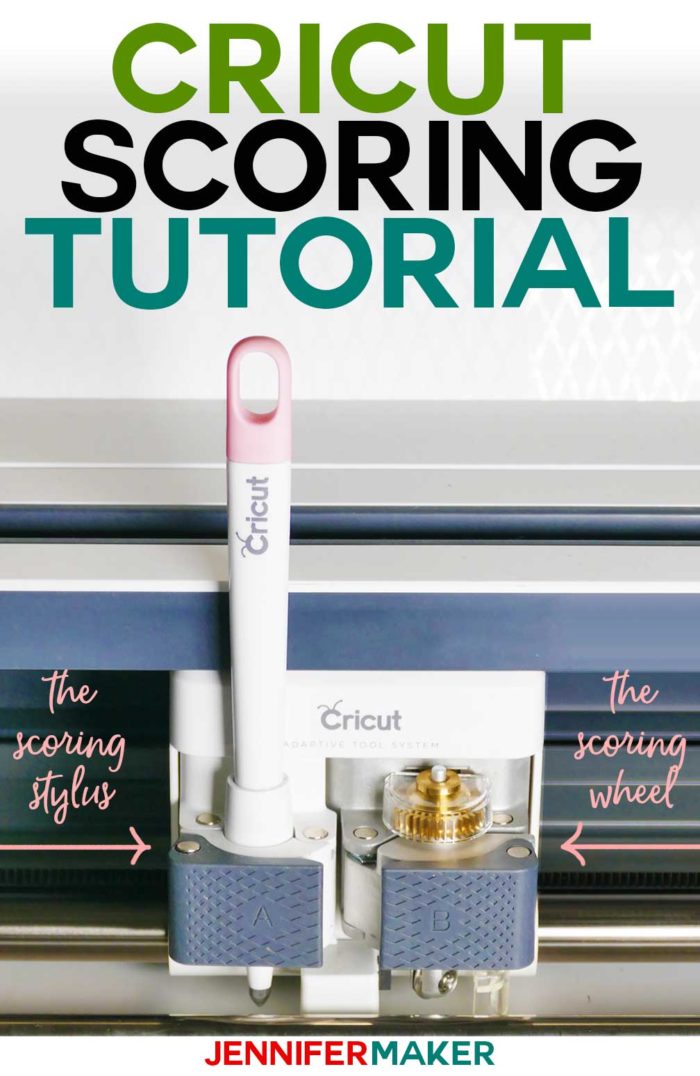
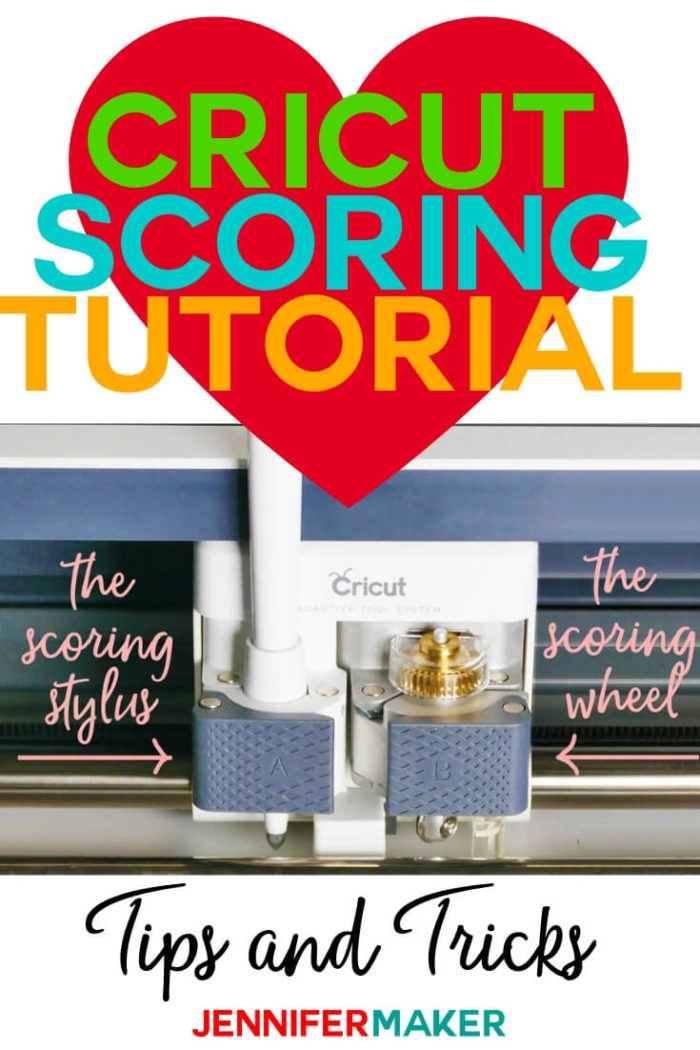
There are currently two different Cricut scoring tools: the Scoring Stylus and the Scoring Wheel. The Scoring Stylus can be used in the accessory clamp of any Cricut Explore or Cricut Maker machine. The Scoring Wheel, on the other hand, can only be used in a Cricut Maker. Both the stylus and wheel score fine, but the wheel can exert more pressure and get a deeper, stronger score. Use whichever one you have.
Which Cricut scoring tool should you use? It's mostly going to depend on your machine — if you have an Explore, you have no choice but to use the Scoring Stylus. If you have a Maker, you can decide. I personally use the Scoring Stylus most of the time because that doesn't require that I change the tool mid project.
Tip: Get a Cricut Scoring Stylus or Cricut Scoring Wheel here.
Cricut Scoring: Understanding Layers
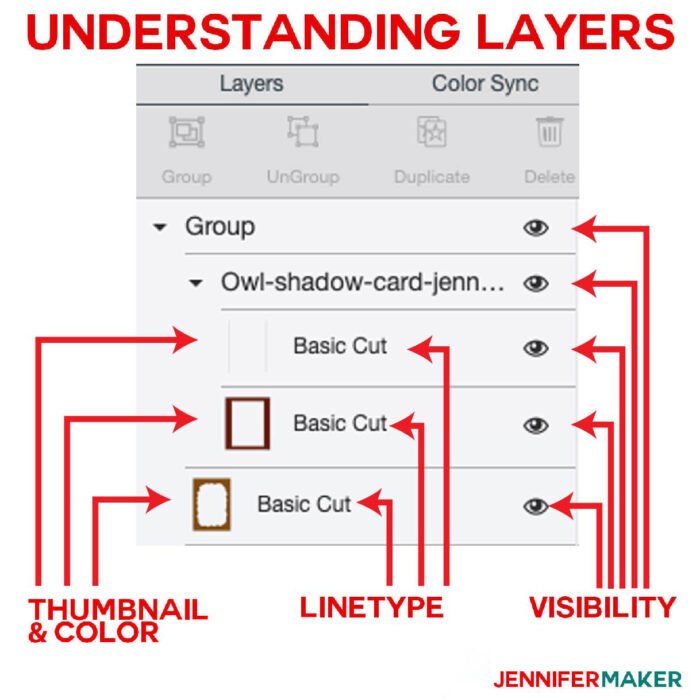
To understand Cricut scoring, we first need to understand the concept of layers in Cricut Design Space. All SVG cut files, except the very simplest, have layers. You can view the layers in the layer panel on the far right side of the Cricut Design Space (on desktop) or by tapping the Layers icon (in the iPhone/iPad/Android app). You can click or tap each layer in the panel and it will highlight and select it on your Canvas.
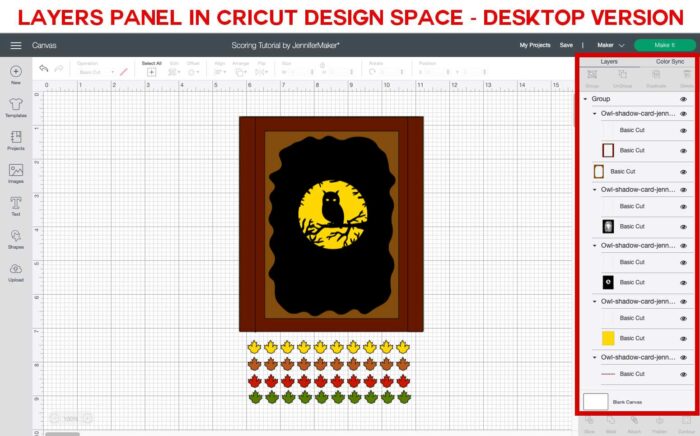
Each line item in your Layers panel shows several important things — a thumbnail of the layer itself (so you can see a general shape), the color (or lack thereof), the linetype (attributes such as cut, draw, score, or print), and whether it is visible or hidden.
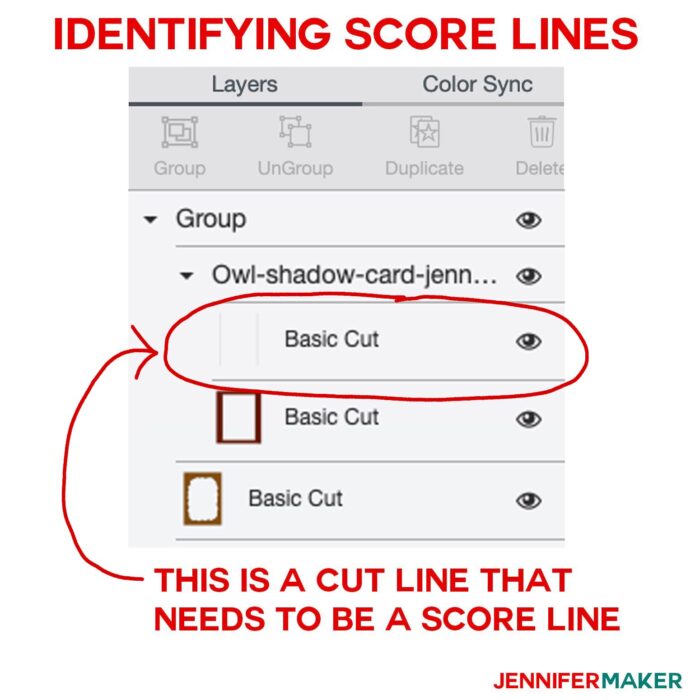
By default, all score layers come in with the "Basic Cut" linetype. But score layers are not intended to be cut; they need to be scored. This particular project, like many other SVG projects I make, has score lines built in to help you fold the project after it is cut.
But all score lines are really just lines — YOU have to tell Cricut Design Space that you want them to be scored instead of cut.
Thankfully, this is easy. Here's how you do it:
How to Change Cut Lines to Score Lines in Cricut Design Space
First, you need to upload your SVG cut file to Cricut Design Space. Here's how to upload SVG cut files on Desktop (Mac or PC), and here's how to upload SVG cut files on the iPad/iPhone.
Second, you need toidentify the score lines.
Here's a video of me setting and attaching score lines if you like to learn that way:
Your instructions or tutorial for the file will usually mention which lines are score lines, but you can also tell which layers are score lines with the fact that their thumbnail has NO color in the layers panel (it just looks empty). There is no color because it's just a line or set of lines.
Once you find it, do this to get your Cricut scoring lines set correctly in the DESKTOP version of Cricut Design Space:
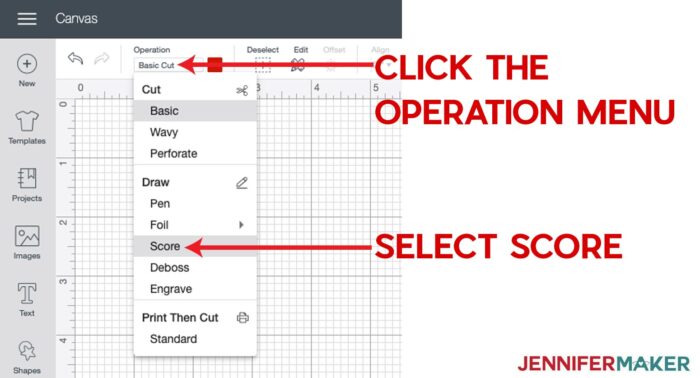
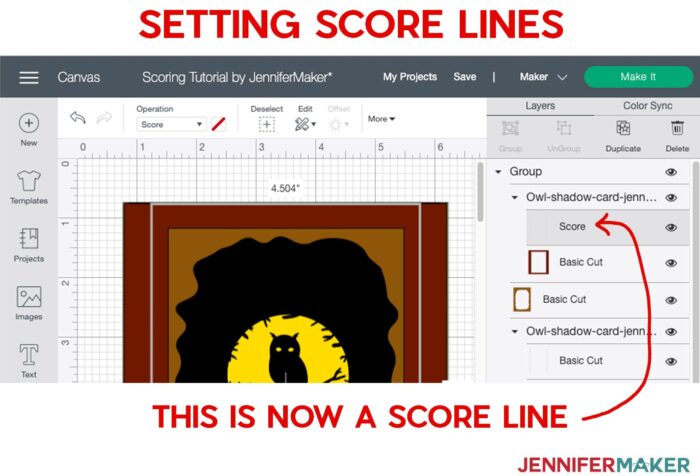
- Click the layer with the lines to be scored to select it. When you have selected a layer, it will turn dark gray in the Layers panel.
- Go to the Operation menu at the top of your screen and change it from Cut to Score.
Here's what the layer looks like now that it is properly set as a score line:
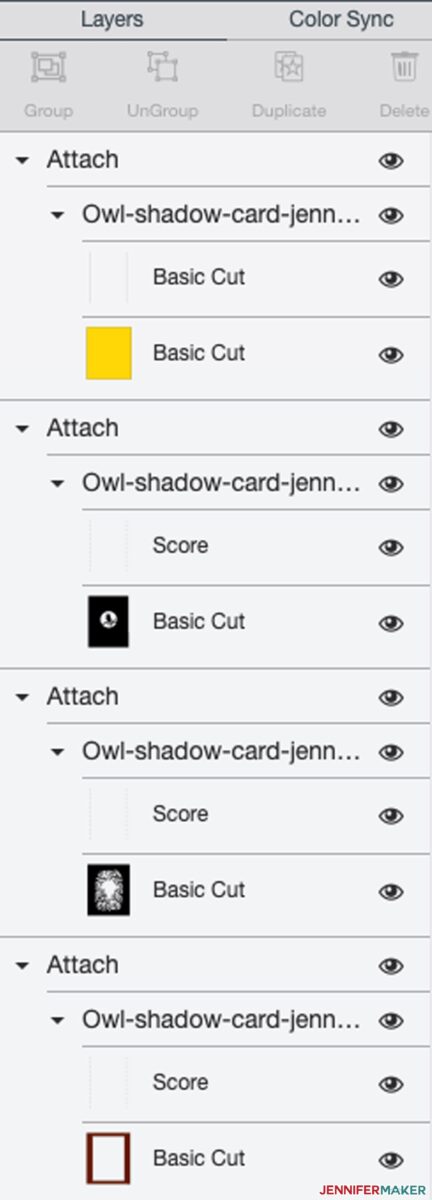
Do this for each score line layer. In this file, there are four of them, all indicated by the colorless thumbnail.
Great! So now our score lines have their linetypes properly set. But we're not done yet. Keep reading!
How to Ungroup and Attach Layers in Design Space
One important thing you must do is understandGrouping, Ungrouping, and Attaching Layers, because it applies to scoring!
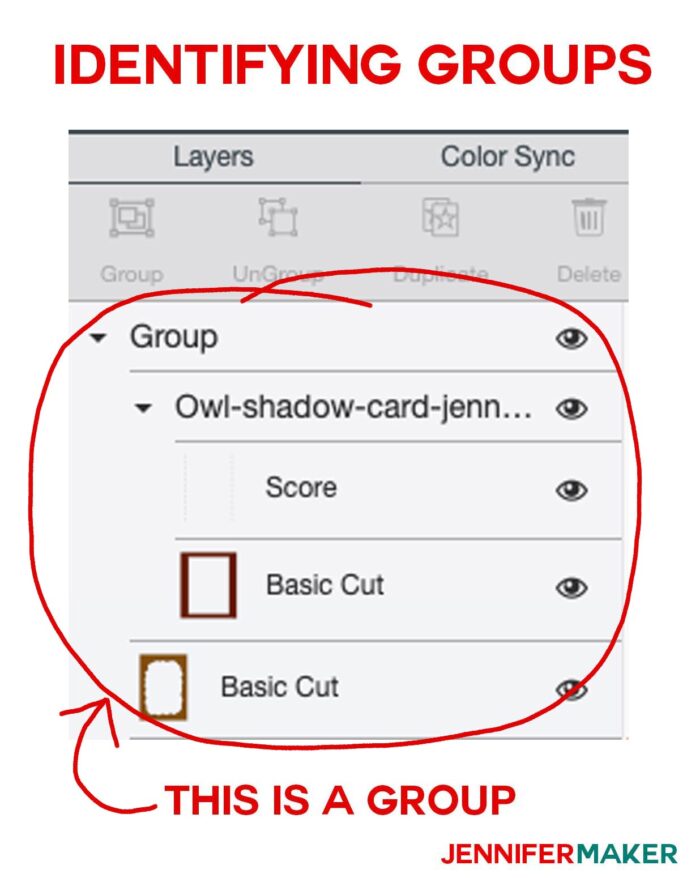
Let's look closely at the layer of the Owl Shadow Box Card. At the top of the Layers panel, note that there is a small black arrow next to the word "Group." This black arrow indicates which layers in this file are grouped together. If you click the arrow icon to the immediate left of the word "Group," it will display (or collapse) all items in that group so you can see what is in the group. In this case, everything in this file is grouped.
Before we can change anything about how these layers are attached together, we need to UNGROUP the layers. To ungroup, click on the layer that says Group (it should turn dark gray which lets you know it has been selected), then click Ungroup at the top of the Layers panel.
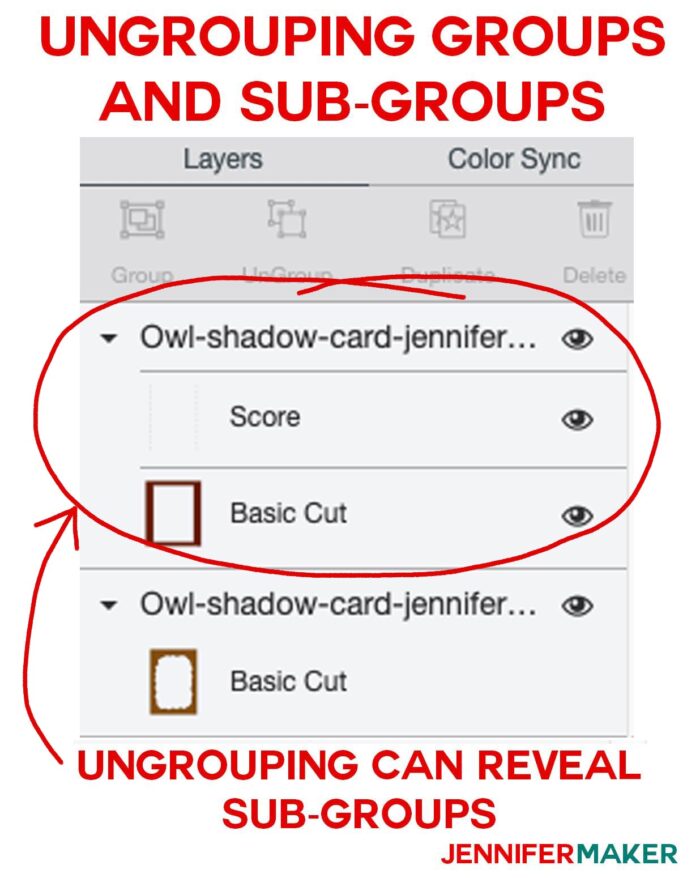
You'll see now the word "Group" is gone, but we still have a bunch of black arrows! Those black arrows indicate the sub-groups that were in this group. So this is important to note — some files, especially more complex ones, have more than one grouping. You can always ungroup any group, if you need to.
In this case, however, we don't need to ungroup these subgroups. They were setup on purpose so that the score lines were grouped with the layer they belong to. This is important because it's now necessary to ATTACH the score lines to the appropriate layer.
Now, I gotta be real with you. This idea of grouping and attaching was hard to wrap my head around at first, and judging from all the emails I get and comments I see on Facebook, it's hard for you too. At this point, I have a good grasp on it, so let me try to explain the difference.
Grouping is just a way to indicate layers that belong with one another. Those layers may be anywhere on the Canvas — they are together, but not fixed in place together. Attaching, on the other hand, keeps those layers physically together when you go to cut the file. So they aren't just together, they are linked by position.
Think of it this way. Grouping is like taking a walk in a park with someone you love. You might walk a little faster or slower at times, someone might stop to talk to a friend, but otherwise you're together — you'll arrive and leave at the same time.
Attaching is like holding hands while you're taking that walk. You have to walk at the same pace and stay together when you're holding hands, right? One doesn't go anywhere without the other.
This is important because we need to get our appropriate score lines and cut lines to hold hands! We need to attach them!
Thankfully, this is also pretty easy. Just select the two layers you want to attach to one another (hold down the Shift key as you click on each layer to select multiples) and click the Attach button at the bottom of the Layers panel. When it is successful, the word Attach appears above the layers to indicate they are now attached together.
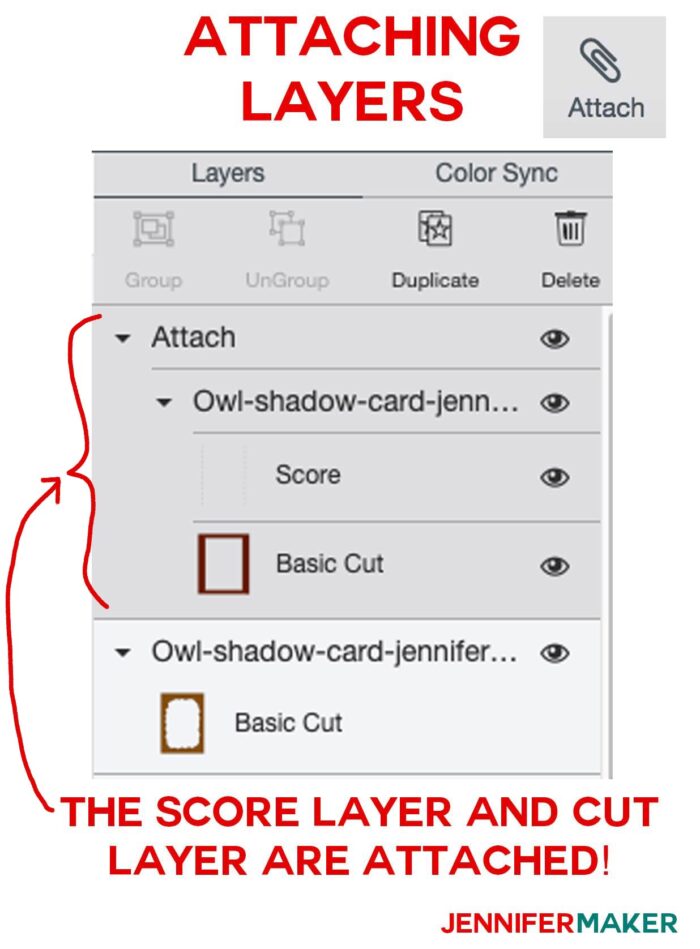
You'll want to attach all of the layers that have score lines to their cut lines, just like this.
Now, something that trips people up is when they cannot attach two layers. This is pretty much always because of a group. If you ungroup layers and keep ungrouping until the groups are all gone, you can always attach two layers together. Next time you have an issue with attaching, make sure you've ungrouped EVERYTHING, then try to attach the layers.
Ok, now that we've modified the layer linetypes from Cut to Score, and attached the layers with the Score Lines to their appropriate Cut Layers, let's save this project! Just click the Save link up in the top right corner, give it a good name, and click Save. Now this project is in our Cricut Cloud and can be accessed anytime we open Cricut Design Space regardless of where we are.
And this file is now ready for cutting. Just click that Make It button and you're good to go.
More Cricut Tips and Tutorials
Here are more of my Cricut tips and tutorials to help you make the most of your Cricut!


 I hope you found this tutorial helpful! If you are looking for more help with your Cricut, be sure to checkout my Cricut Coach Playbook filled with one-page reference sheets for all of the popular tasks in Cricut Design Space.
Love,

Want to remember this? Save the Cricut Scoring Tools & Tips to your favorite Pinterest board!
How to Use Attach in Cricut Design Space
Source: https://jennifermaker.com/cricut-scoring-tools-tips/
0 Response to "How to Use Attach in Cricut Design Space"
Postar um comentário